
Each year, we produce 12 articles throughout the last few weeks of the year, all revolving around one central concept. This year, all 12 articles will revolve around the topic of "Enhancing Your Process With Scalable Customization in 2021. Today we discuss the Custom Modeler tool and static allocations.
Over the last decade, the advisory business has continued to evolve rapidly with the growing trends of lower fees and increased automation. With the influx of low-cost index funds and Robo-advisors offering nearly-free financial planning, investors can now gain beta market exposure at rock-bottom prices without ever setting foot in an advisor's office. The upshot is that it is now more challenging than ever for you as a traditional financial advisor to justify your fee and grow your client base. That said, you must scale your process and sharpen your value proposition as much as possible. To help you do just that, this year's 12 Days of Christmas Series, "Enhancing Your Process With Scalable Customization in 2021," will navigate you through the benefits, use/implementation, and customization of rules-based, Relative Strength-driven guided model portfolios. Additionally, this series will highlight the NDW Model Builder Tool's new features, providing relevant use-cases to help you scale your business in the coming year.
Day 1 - Benefits of Models and a Rules-Based Process
Day 2 - The Relative Strength Process
Day 3 - Model Foundations - The Relative Strength Matrix
Day 4 - Model Foundations – Technical Attributes and the Fund Score Method (FSM)
Day 5 - Model Foundations - Matrix Models
Day 6 - Model Foundations - FSM Models
Day 7 – DALI and Tactical Allocation Models
Thus far in our 12 Days of Christmas Series, “Enhancing Your Process With Scalable Customization in 2021,” we have discussed the basics of relative strength and relative strength-based tools like the matrix. We have also seen how these tools can be used to create scalable, rules-based models, and reviewed some of the existing models on the NDW platform. Now that we’ve reviewed the tools and processes underlying our guided models, we want to turn our attention to the Custom Modeler tool, which can be accessed under Models & Products > Custom Models,
The Custom Modeler allows users to create and backtest their own models using stocks, mutual funds, ETFs, or even existing models. The custom modeler acts as your own personal laboratory, allowing you to mix, match, and then test almost any combination of “ingredients” you can think of.
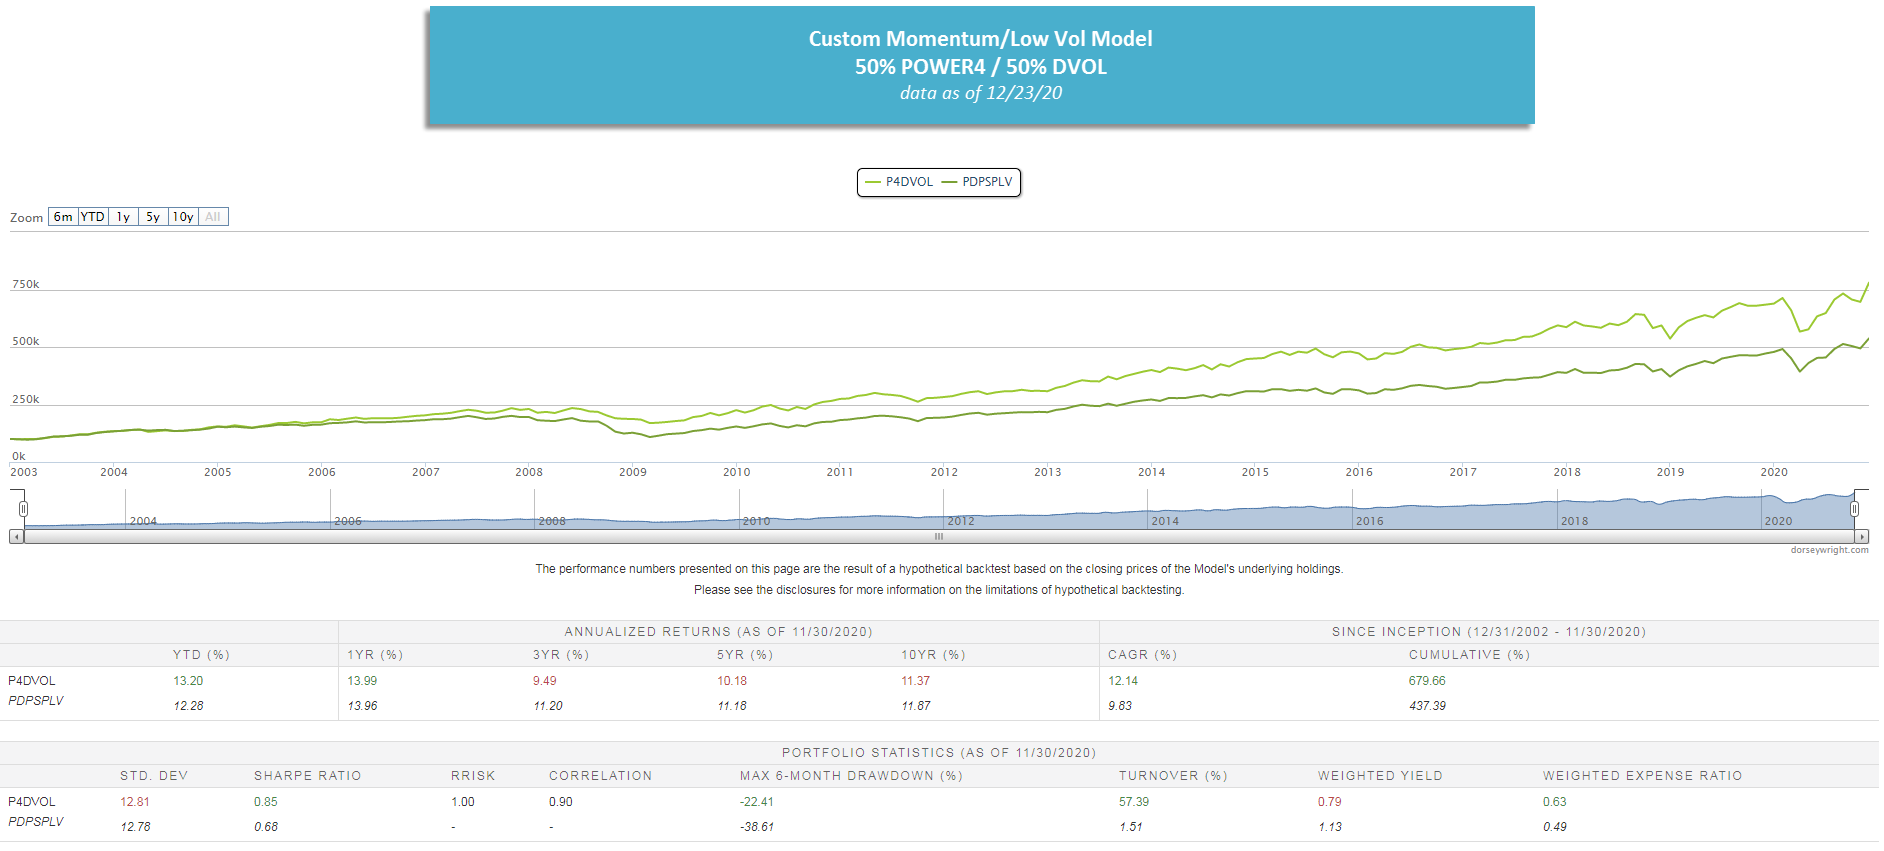
The simplest of the custom models is the static allocation which combines two or more securities using weights that you define. For example, what if instead of using the existing PDPSPLV model, you wanted to create your own custom version of a momentum/low vol strategy using different ETFs and/or guided NDW models? Instead of SPLV, what if you wanted to substitute the First Trust Dorsey Wright Momentum & Low Volatility ETF DVOL? And for momentum, what if you used the DWA Sector 4 Model POWER4 (which was discussed in the article from Day 6 of this series)? This is where the custom modeler comes into play. Below, we created a static allocation to test a simple 50/50 split between the POWER4 model and DVOL to create our own momentum/low vol strategy. The Model Preview page provides yearly returns and various risk statistics that could potentially be used in conversations with clients and prospects.
Custom Models - Where to Start?
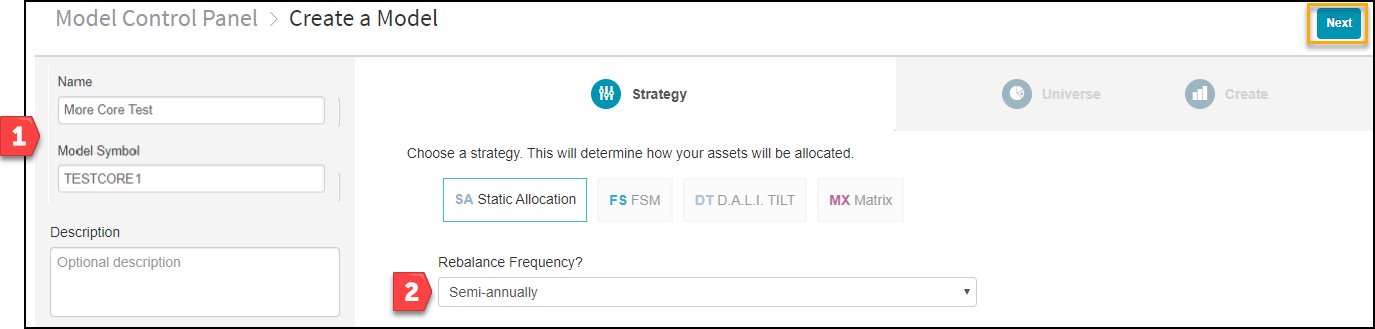
To begin, notice the outlined workflow: developing a "Strategy", selecting a "Universe", and "Creating" a model preview. To create a strategy, first give your model a name, symbol, and description as prompted on the left-hand side. Second, decide if you want it to rebalance; if so, select the desired frequency from the dropdown menu. A rebalance is dependent upon your drift percentage (step 3), meaning how much deviation from target/initial position weightings you will allow. Note all rebalances will occur on the last trading day of the selected period (unless a custom date is chosen). After completing those two steps, click "Next" on the upper right-hand side to select a universe.
Create a Universe - Building Your Allocation
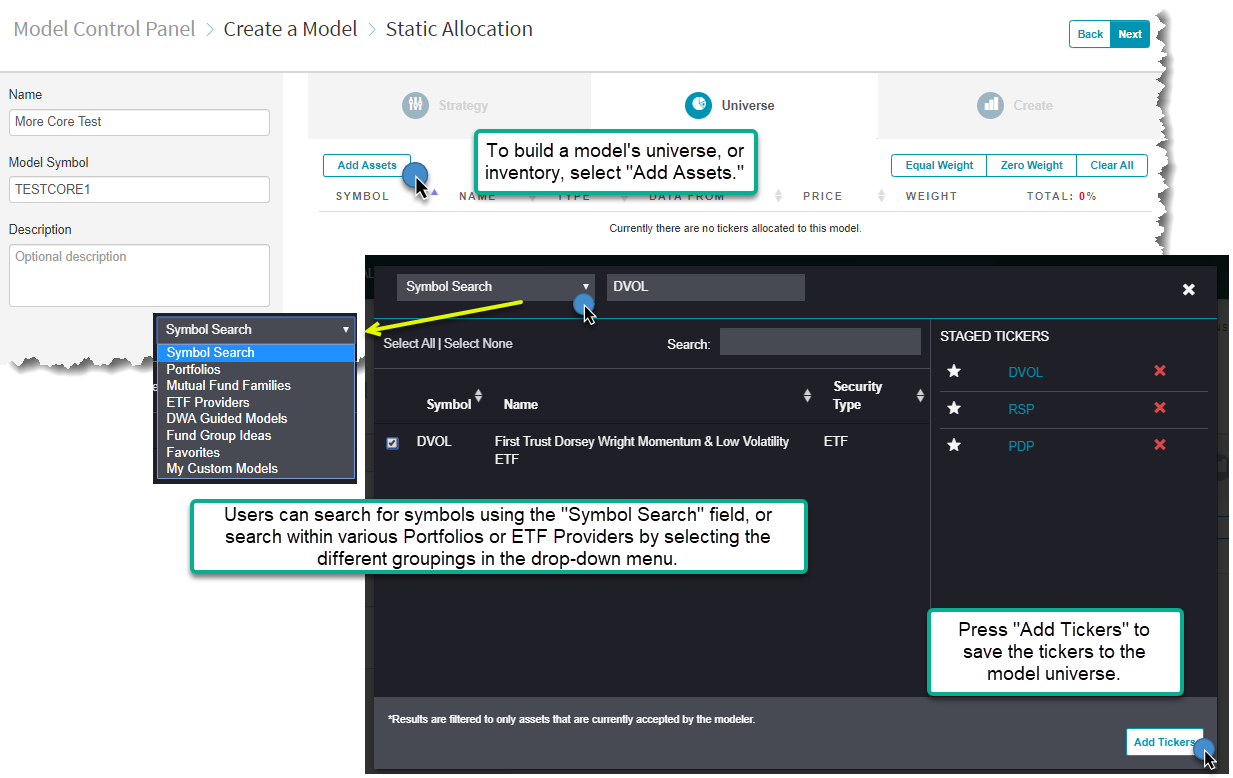
The next step in designing and building a custom model is creating the model universe. This is done by pressing the “Add Assets” button, which allows you to start adding tickers to the model universe for testing. When you select the “Add Assets” button, a window will appear, giving you the ability to search for symbols in the database, add tickers from your portfolios, or select from the various guided NDW models. To access these choices, select the drop-down menu in the top left that says, “Symbol Search.” You can also just search for tickers using the search box at the top. Once the tickers appear in the table below, you can search through large lists using the search box in the lower table. To add a security to the model universe, check the box to the left of the ticker symbol. Once selected, it will be added to the "Staged Tickers" section. When you are content with your list, press “Add Tickers.” After the tickers have been added to the model's universe, you can now adjust the weightings of the positions. Toggle the weightings in the number box by either manually typing in the weight or using the "stepper" function (clicking the arrow in the box). Once you are satisfied with your weights, press the "Next" button in the top right to navigate to the last step.

Create Preview - Initiate Backtest
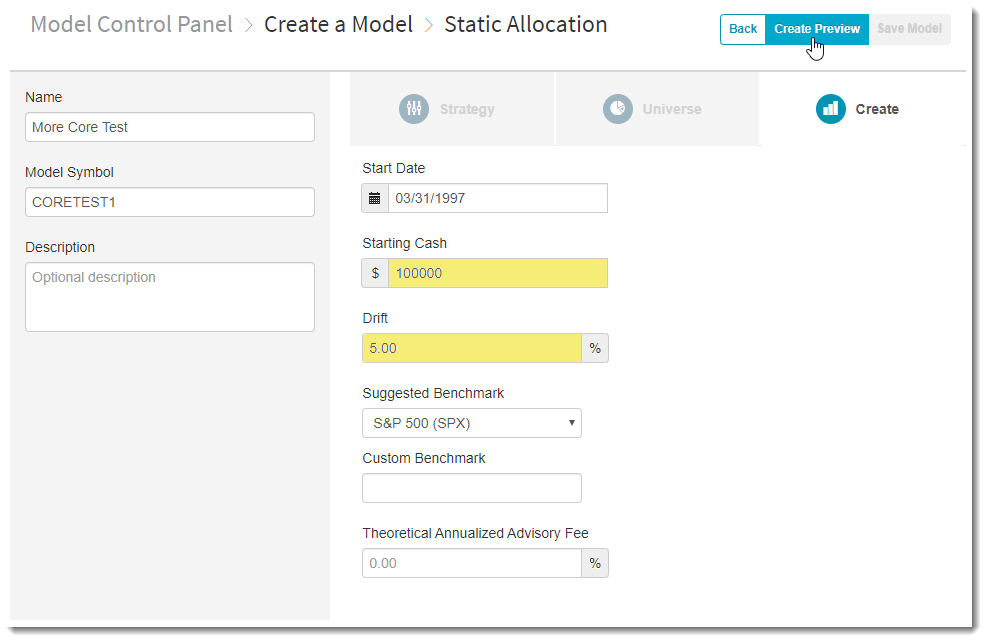
After designating your universe, you now can set the general guidelines that your static allocation model will follow. This includes establishing the allocation for each security, which we have set as equal-weighted for our three fund examples today. The system will default to take the backtested model back as far as we have price data available for the names included, however, you can adjust the start date to any date after that initial common date. This page also allows you to adjust the drift of each of the model holdings, which will give their allocation a buffer zone at each evaluation to avoid unnecessary rebalances. In our example, we have chosen a 5% drift, so if the funds are within 5% of their target allocation at the time of our designated model evaluation, they would not be rebalanced.
Create Preview - Analyze Your Model
The “Create Preview” button will then bring up the backtested results of your custom model. You will first see a growth graph of the model since the start date of the test, with a link above the graph that allows you to edit the basic test information such as time frame and the benchmark used in the comparison. This graph is also adjustable, so hovering over any point will show performance through that date and you can adjust the amount of data displayed using the scrolling bar underneath the X-axis.
Beneath the graph itself, we have additional performance and risk metrics available for your analysis. These include compounded annualized growth numbers as well as the Sharpe ratio, correlation to your benchmark, and max 6-month drawdown throughout your testing history. For those looking for more information on any of these additional metrics, please reach out to us either by email (dwa@dorseywright.com) or by phone (804-320-8511). You are also able to export the monthly returns of the model to an excel file by clicking on the “Export to CSV” button in the upper right-hand corner of the page. Clicking on the green “Save Model” button will save the test and allow you to use it throughout other aspects of the platform.

Where to find your custom models?
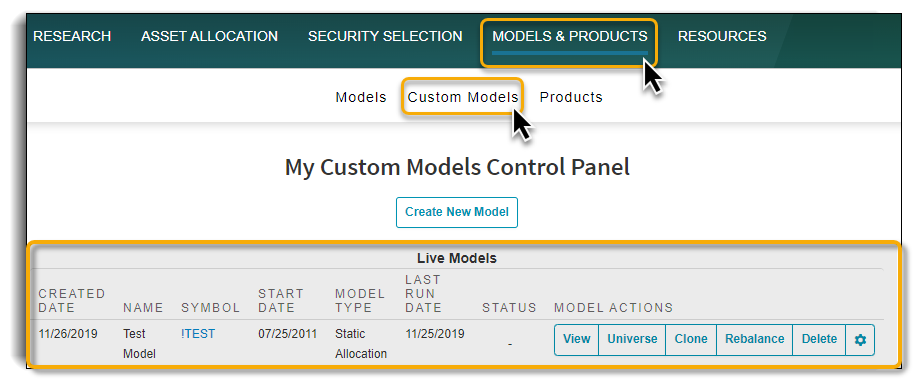
After you’ve gone through the various steps to create and save your custom model, it will take a few seconds to process and save to the NDW system. After processing, your model will be supported on the site and can be easily accessed in two different places. The first place is directly from the Custom Models Control Panel, which you can navigate to by clicking the Models & Products tab -> Custom Models. Here you will find all your live models listed along with each model’s respective creation date, custom symbol, backtest start date, model type, and last run date. Using the buttons under “Model Actions” you can do things such as rebalance, rename, clone, delete, or edit your model.
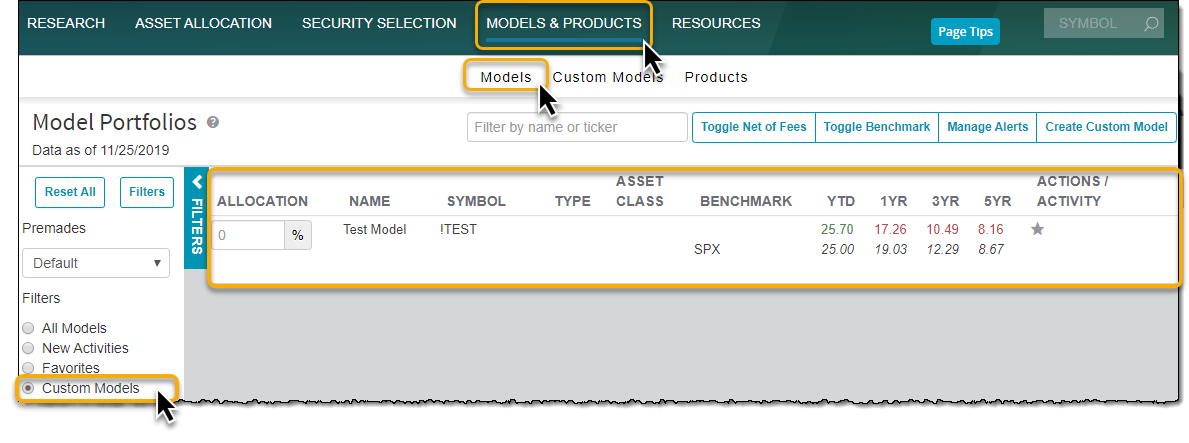
Your custom model will also be supported directly on the Models Page along with all the other pre-made NDW stock, ETF, and mutual fund models, which can be found under Models & Products > Models. To quickly find your custom models, be sure to use the “Custom Models” filter on the left-hand side of the screen. Once you have filtered out your Custom Models, the Models Page will display performance numbers for your custom models and their respective benchmarks along with the name and symbol. By clicking on the model, you can delve deeper into the model details, holdings, returns, trades, the universe, and stats.
Security Screener - Tracking Models (Portfolios) Going Forward
One of the benefits of the new Custom Model tool is the ability to track the performance of your custom models, which are essentially backtested "portfolios," on the system, so you will be able to keep track of important statistics and metrics going forward. Through the Models page, you will be able to access any created custom model, providing the ability to see returns and important portfolio stats, such as sector exposure, size and style exposure, weighted average yield, and classic performance - risk metrics, such as Sharpe Ratio, beta, etc.

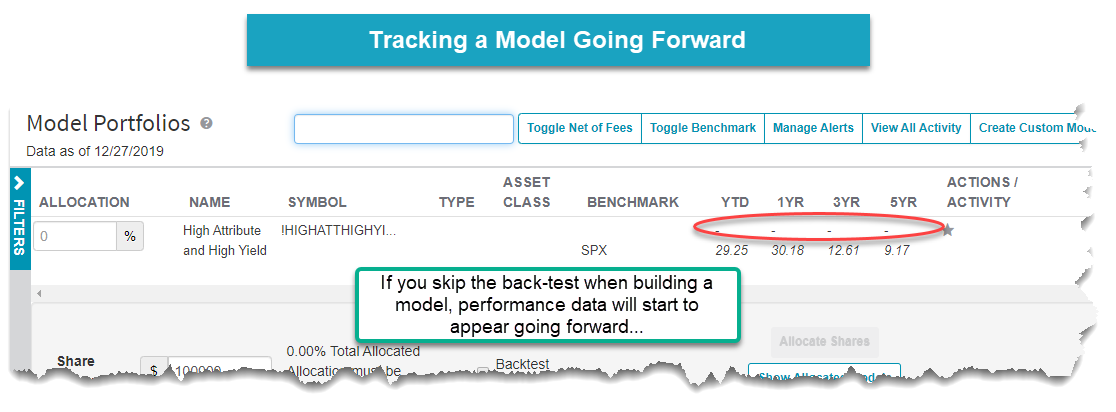
Tracking performance on an ongoing basis can be particularly helpful as you add custom model portfolios to your practice. One example of the potential benefit this could bring is using a custom high relative strength and high yield model that is derived from a filter in the NDW Security Screener. Imagine running a screen for high yielding, high RS stocks, and then wanting to track the total return of that model. Well, now you can through the custom model tool. Simply use the Security Screener to search for stocks, select "Total Return" as a filter, and then save the names to a portfolio. Once the portfolio has been saved, you will be able to select it through the custom model tool (see graphic below). This allows for backtesting to see historical performance, or you can skip the backtest, and track the returns going forward, which is what we did for this example. The premise here is that one can use the Security Screener to find ideas, then track the ideas like a model portfolio going forward.
Custom Model as a Benchmark
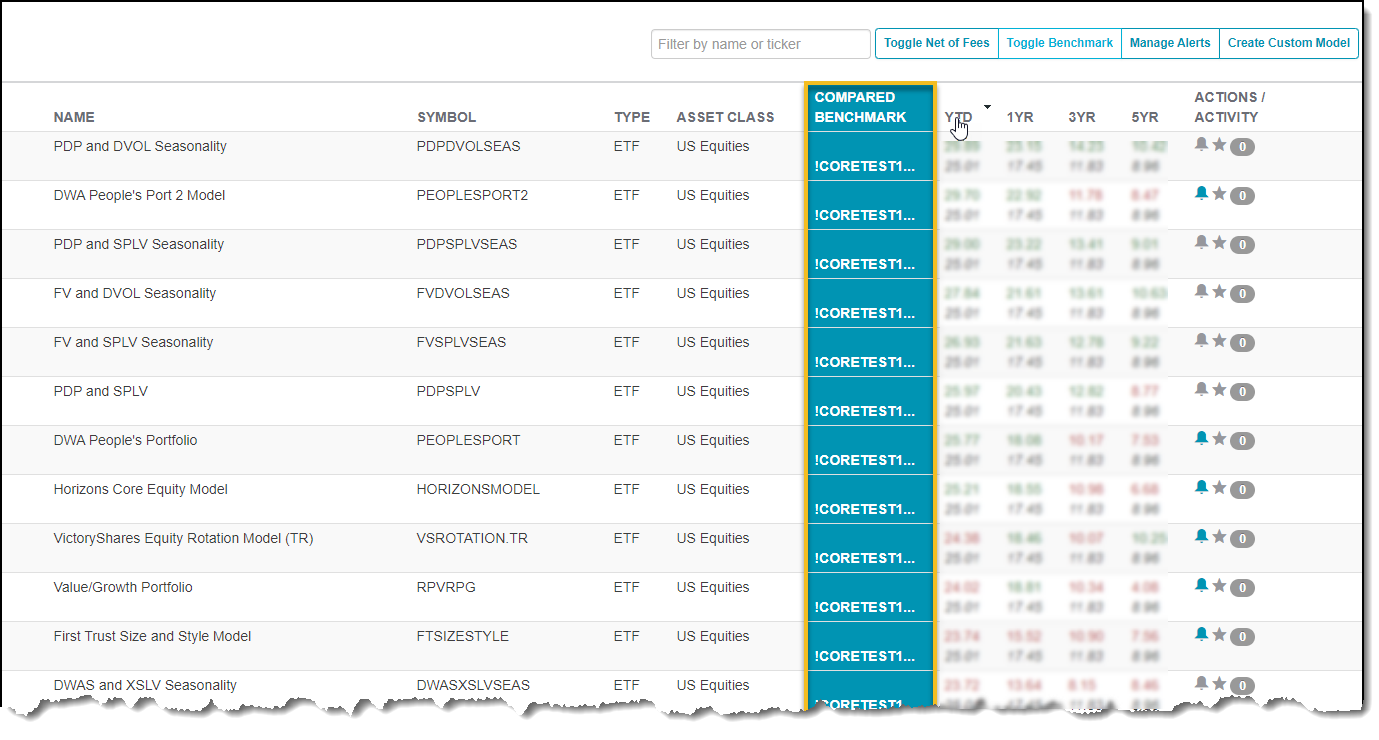
While the custom models can be extremely helpful in tracking your investment approach, they can be equally as helpful in creating your custom benchmarks for comparison against other models on the platform. Let’s say you wanted to use our equal-weighted model of PDP, DVOL, and RSP to view how this portfolio stacks up against other similar models on the site. To do this, simply navigate back to the Model Portfolios page, then click on the “Toggle Benchmark” button on the upper right-hand side of the page. You can then enter the ticker that you chose for the model as the benchmark, and then click on the “Compare” button to view how it stacks up against the other models on your display. In the example below, we have sorted the “Domestic-Broad” model filter for year-to-date returns, with those higher-performing models at the top of the list. Static allocations can also be useful for benchmarking other custom models or entire client portfolios. For example, if you have a multi-asset model that includes US equities, international equities, and fixed income, you could create a static allocation comprised of the S&P 500 SPX, EAFE Index EAFE, and the US aggregate bond index LBUSTRUU to act as its benchmark.
(The image above is for illustrative purposes only and does not represent a past or present recommendation.)
Now that we've covered static allocations, the next two entries in our series will cover creating custom matrix and FSM models.
